How to Set Up Your Humanoid Robot: First Steps & Configuration
Step-by-step guide to unboxing, initial configuration, Wi-Fi setup, and first tasks for your new humanoid home robot.
Robots4Home Team
robots4home.uk
So your humanoid robot has arrived. Congratulations — you are about to bring one of the most exciting pieces of consumer technology into your home. Whether you have picked up a compact companion like the Bumi or a full-sized assistant such as the Unitree G1, the setup process follows a broadly similar path. In this guide we walk through every step, from clearing space in your living room to issuing your very first voice command. If you are still deciding which model to buy, our first-time buyer’s guide is a great place to start.
Before you open the box
A little preparation goes a long way. Spending fifteen minutes on these tasks now will save you frustration later.
Clear the floor space. Your robot will need a minimum area of roughly 2 m x 2 m for its initial calibration routine, and ideally more for its first exploratory walk. Move coffee tables, rugs with curled edges, cables, pet bowls, and anything breakable well out of the way. Hard, flat flooring is best for the first session — carpets can wait until calibration is complete.
Charge the included battery fully before you begin. We know it is tempting to power on straight away, but every manufacturer recommends a full first charge. Plug the charging dock (or direct cable, depending on your model) into a wall socket and leave it until the indicator shows 100 per cent. This conditions the cells and gives you the longest possible runtime for your first session.
Download the companion app. Every major humanoid robot ships with a smartphone application — Unitree’s is simply called Unitree, the NEO Beta uses 1X Home, and Bumi pairs through the Bumi Companion app. Download and install it on your phone before you start unboxing so you are ready to go.
Check your Wi-Fi. Your robot needs a stable 2.4 GHz or 5 GHz connection (check your model’s specifications — some only support 2.4 GHz). Make sure you know the network name and password. If your router is in a different room, consider whether a mesh node or Wi-Fi extender might be needed. A weak signal during initial firmware updates can cause the process to stall.
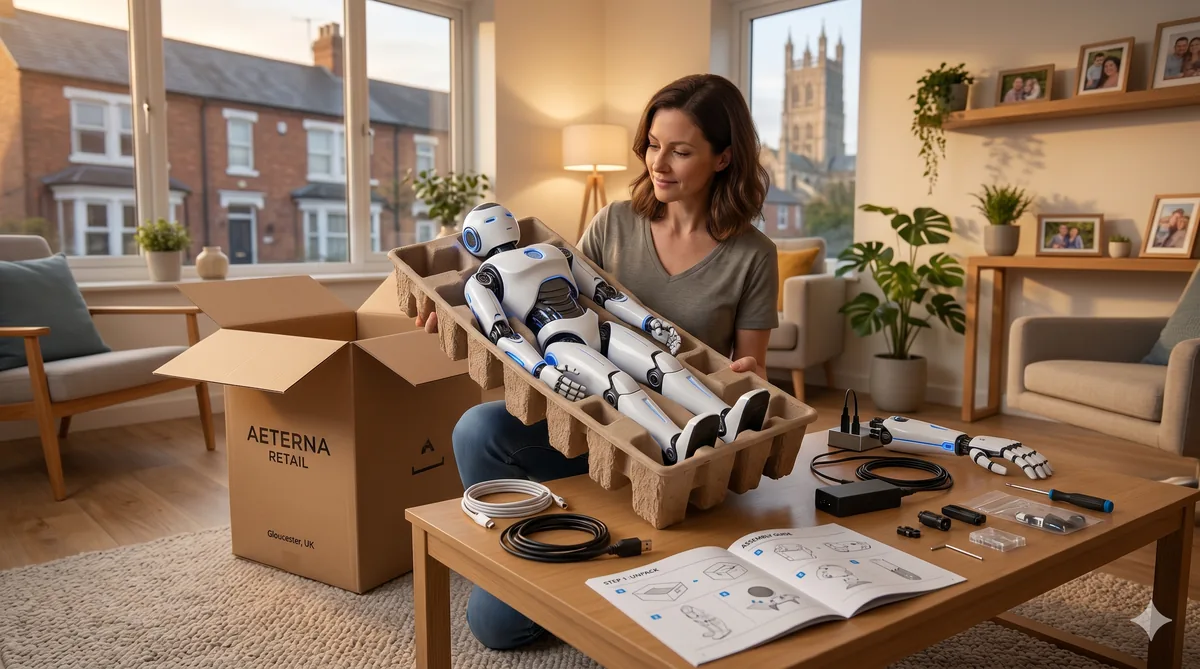
Unboxing safely
Humanoid robots are heavier than most people expect. A Bumi tips the scales at around 18 kg, which one person can manage comfortably, but the Unitree G1 weighs roughly 35 kg and the NEO Beta comes in at approximately 30 kg. For anything over 25 kg we strongly recommend a two-person lift.
Open the outer carton from the top and remove the foam inserts first. Most robots ship in a semi-folded or seated position secured by straps and moulded packaging. Cut the straps carefully — never use a blade near the robot’s skin or sensor clusters. Lift the robot out by its torso, not by the limbs or head, and place it on the floor in an upright or seated position as the quick-start card instructs.
Lay out every accessory and cross-reference it against the packing list. You should typically find a charging dock or cable, a quick-start guide, a safety leaflet, and sometimes additional hand or gripper attachments. Missing parts should be reported to the manufacturer before you proceed.
For a deeper look at keeping yourself and your household safe throughout the robot’s lifetime, read our full humanoid robot safety guide.
The first charge
Connect the charging dock to mains power and place your robot on or against it according to the manual. Most models display a slow-pulsing LED while charging and a solid light when full. First charges typically take between two and four hours.
While you wait, this is a perfect time to read through the safety leaflet and skim the user manual. Pay particular attention to the emergency stop procedure — every robot has one, and you should be able to trigger it from muscle memory before the unit takes its first step.
App setup and account creation
Open the companion app and create your account. You will usually need an email address, a password, and agreement to the manufacturer’s terms of service. Some apps (notably 1X Home) also ask for a brief household profile — number of residents, pets, floor plan size — so the robot can tailor its behaviour from the start.
Once your account is ready, the app will prompt you to pair with the robot. This is usually done over Bluetooth Low Energy: power on the robot, tap “Add new device” in the app, and wait for it to appear. Follow the on-screen prompts to confirm the pairing code displayed on the robot’s chest screen or status LED pattern.
Wi-Fi configuration
After pairing, the app will ask you to select a Wi-Fi network and enter the password. The robot connects, downloads any pending firmware updates, and restarts. Do not interrupt this step. Firmware updates can take ten to twenty minutes on the first run and often include critical motor-control and safety patches.
If the connection fails, move the robot closer to your router for this initial step. You can always relocate it once the update is complete. Some models also support configuration via an ethernet-to-USB adapter if Wi-Fi proves unreliable during setup.
Initial calibration and mapping
With firmware up to date, your robot is ready to learn its environment. The calibration process varies by model but generally involves two stages.
Self-calibration. The robot runs through a series of joint movements, checking motor responses against expected values. It will flex its arms, rotate its torso, and shift weight between its feet. Stand at least one metre away and let it finish undisturbed.
Room mapping. Using its onboard LiDAR, depth cameras, or a combination of both, the robot performs a slow scan of the room. Some models walk a circuit automatically; others ask you to guide them using the app’s joystick controls. The resulting map is stored locally and in the cloud, and you can name rooms, mark no-go zones, and set preferred pathways later in the app.
For households with multiple floors, most robots will need to map each level separately. Carry the robot between floors (or use the lift if your model supports it) and repeat the mapping process.
First movements
This is the moment you have been waiting for. Before you tap “Start” in the app, run through this quick checklist:
- The floor is clear of obstacles and trip hazards.
- Children and pets are at a safe distance or behind a baby gate.
- You know where the emergency stop button is — on the robot and in the app.
- Someone else is present. We recommend never being alone for the very first activation.
Begin with the guided “First Walk” mode that most companion apps offer. The robot will take slow, deliberate steps in a straight line, pause, turn, and return. It is mapping the floor surface and refining its balance model in real time. Resist the urge to touch or redirect it mid-stride — let the algorithms do their work.
Once the first walk completes successfully, try a few basic commands through the app: “Come here,” “Stop,” “Go to the kitchen.” These will confirm that both navigation and voice or app control are functioning correctly.
Setting up daily routines
Most companion apps include a scheduler or routines section. This is where your robot begins to earn its keep. Common first routines include:
- Morning greeting. The robot moves to the kitchen at 07:00, reads the weather, and reminds you of calendar events.
- Security patrol. A nightly walk through the house checking doors and windows, with a notification to your phone if anything is amiss.
- Tidy-up reminder. The robot identifies items left on the floor and either moves them (if its manipulators allow) or alerts you.
Start with one or two simple routines and add more as you grow confident. Our guide on how to train your humanoid robot covers advanced routine building and behaviour customisation in detail.
If you also want your robot to work with smart lights, locks, and thermostats, have a look at our smart home integration guide for step-by-step instructions.
Voice command training
Out of the box, your robot will respond to a default wake word and a set of standard commands. To improve recognition accuracy, most apps include a voice-training wizard that asks you (and other household members) to repeat a series of phrases. This typically takes about five minutes per person and dramatically reduces misrecognition, especially in homes with strong regional accents or background noise.
Tips for better voice recognition:
- Train in the room where you will issue commands most often.
- Speak at your normal volume — do not shout or whisper.
- Add each household member as a separate voice profile so the robot can tailor responses.
- Re-run training if you rearrange furniture significantly, as changed acoustics can affect microphone performance.
Troubleshooting common setup issues
Even with careful preparation, hiccups happen. Here are the issues we see most often.
Robot will not power on. Confirm the charging dock has power (check the LED on the dock itself). Try a different wall socket. If using a direct cable, ensure it is fully seated — the USB-C connectors on some models require a firm push.
App cannot find the robot during pairing. Make sure Bluetooth is enabled on your phone and that you are within two metres of the robot. Restart both the app and the robot. On Android devices, location services must also be enabled for Bluetooth scanning to work.
Wi-Fi connection drops during firmware update. Move the robot closer to the router and restart the update from the app. If it fails repeatedly, use a mobile hotspot as a temporary network — the robot only needs internet access for the download, not permanently.
Calibration fails or reports an error. Ensure the floor is hard, flat, and level. Even a slight incline can throw off the balance calibration. Remove any rugs and try again.
Robot walks unevenly or drifts to one side. Re-run the self-calibration routine. If the problem persists, check that no packing material or protective film remains on the foot sensors.
For a comprehensive list of fixes, see our dedicated troubleshooting guide.
Model-specific tips
Bumi. Bumi’s compact size makes it ideal for smaller homes, but its lower eye-line means it can miss obstacles above waist height during mapping. Manually mark shelves and worktop overhangs as obstacles in the app after the initial scan.
Unitree H1 / R1. The R1’s advanced manipulation arms require a separate “hand calibration” step found under Settings > Hardware > Grippers. Do not skip this — the default grip strength can be too high for delicate household items until calibrated.
Unitree G1. The G1 is tall enough to navigate standard door handles, but its height also means it needs more vertical clearance. Check that pendant light fittings and low beams are at least 10 cm above the robot’s head before letting it roam freely.
NEO Beta. As a beta product, the NEO receives frequent over-the-air updates. Enable automatic updates in the app settings and expect the occasional overnight restart. Keep the charging dock accessible so the robot can return to it before an update begins.
What comes next
With setup complete, your humanoid robot is ready to become a genuine part of daily life. Spend the first week observing how it navigates, how it handles commands, and where it struggles. Feed that information back through the app — most manufacturers use this data to push personalised improvements.
The learning curve is real, but so is the payoff. Within a fortnight most owners tell us their robot feels less like a gadget and more like a helpful member of the household. Welcome to the future of home living.